Mon 2/26/24: Focal Length Portrait Experiment
Reminders about conduct outside the classroom:
Wear your passes at all times (you may hold it while your portraits are being taken).
Keep noise levels low around classrooms.
Do not socialize with students wandering outside.
Keep away from the lunch quad and student restroom area (stay north of this C building.)
Keep the lens caps in the bags so they don’t get lost!!! Please!!!!!!!!!!!!!!!
Be back in class at least 10 minutes before the bell, maybe more because you all need to save the photos.
Focal Length Portrait Experiment
Battle of the Lenses Experiment_Instructional Handout_2024
Objective:
Understand the differences that focal lengths have on portrait photography.
The Experiment:
In teams of 2 or 3, you will take turns taking portraits of one group member using the following focal lengths and framing:
- 200mm: headshot, waist shot, full body.
- 85mm: headshot, waist shot, full body.
- 50mm: headshot, waist shot, full body.
- 35mm: headshot, waist shot, full body.
- 18mm: headshot, waist shot, full body.
You will end up with 15 photos total each. (Everyone takes their own photographs of another group member!) Save the photos YOU TOOK to your OneDrive.
Instructions…Please read carefully:
- Keep the framings as consistent as humanly possible!!
- Your subject will remain in the same spot the entire time. Only the photographer moves!
- Make sure there is open space behind the subject in order to see the differences in depth of field. Don’t position your subject close to a wall/building!
- Set your camera settings according to the suggestions below.
- Take a test shot to assess the exposure, fix ISO if necessary, then begin your series of shots.
- The only thing that changes is the focal length, the f-stop, and the where the photographer is standing.
Camera Settings: Aperture Priority mode (Av), lowest f-stop at each focal length, ISO 400*
Automatic Focus (AF).
*If the camera chooses a shutter speed lower than 1/100, increase the ISO. If the photo is overexposed (too bright), then lower the ISO.
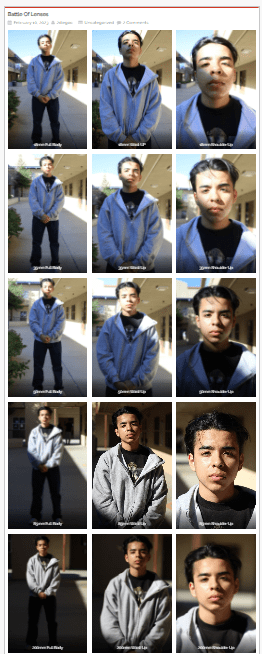
Example: Battle of Lenses – Photo Blog (edublogs.org) (password: photo)
Here’s blurry screenshot, but you get the idea: