Posted in Photo 1 Assignments

Aperture & Depth of Field Photos

Practicing w/ Aperture and Depth of Field using DSLR’s

Due Wednesday Nov. 2nd

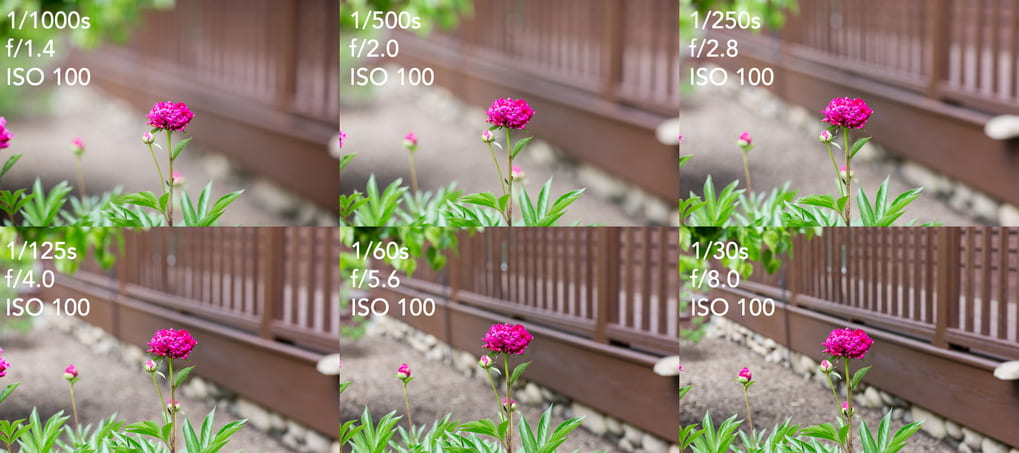
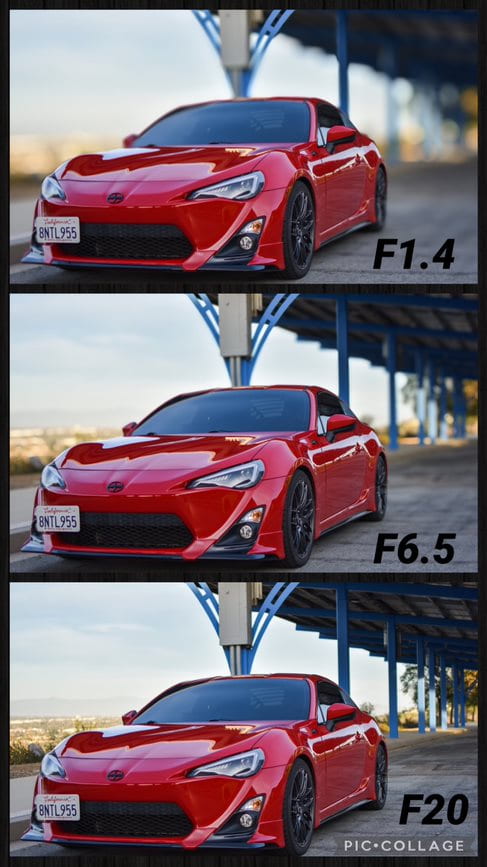
Objective:  Observe the difference in depth of field when a scene is captured with various aperture f-stops. 

Equipment: DSLR camera and tripod.

Instructions:

  1. Set your camera mode dial to “Av” (Aperture Priority) and your ISO to “AUTO”.
  2. Keep your lens completely zoomed out the whole time (18mm).
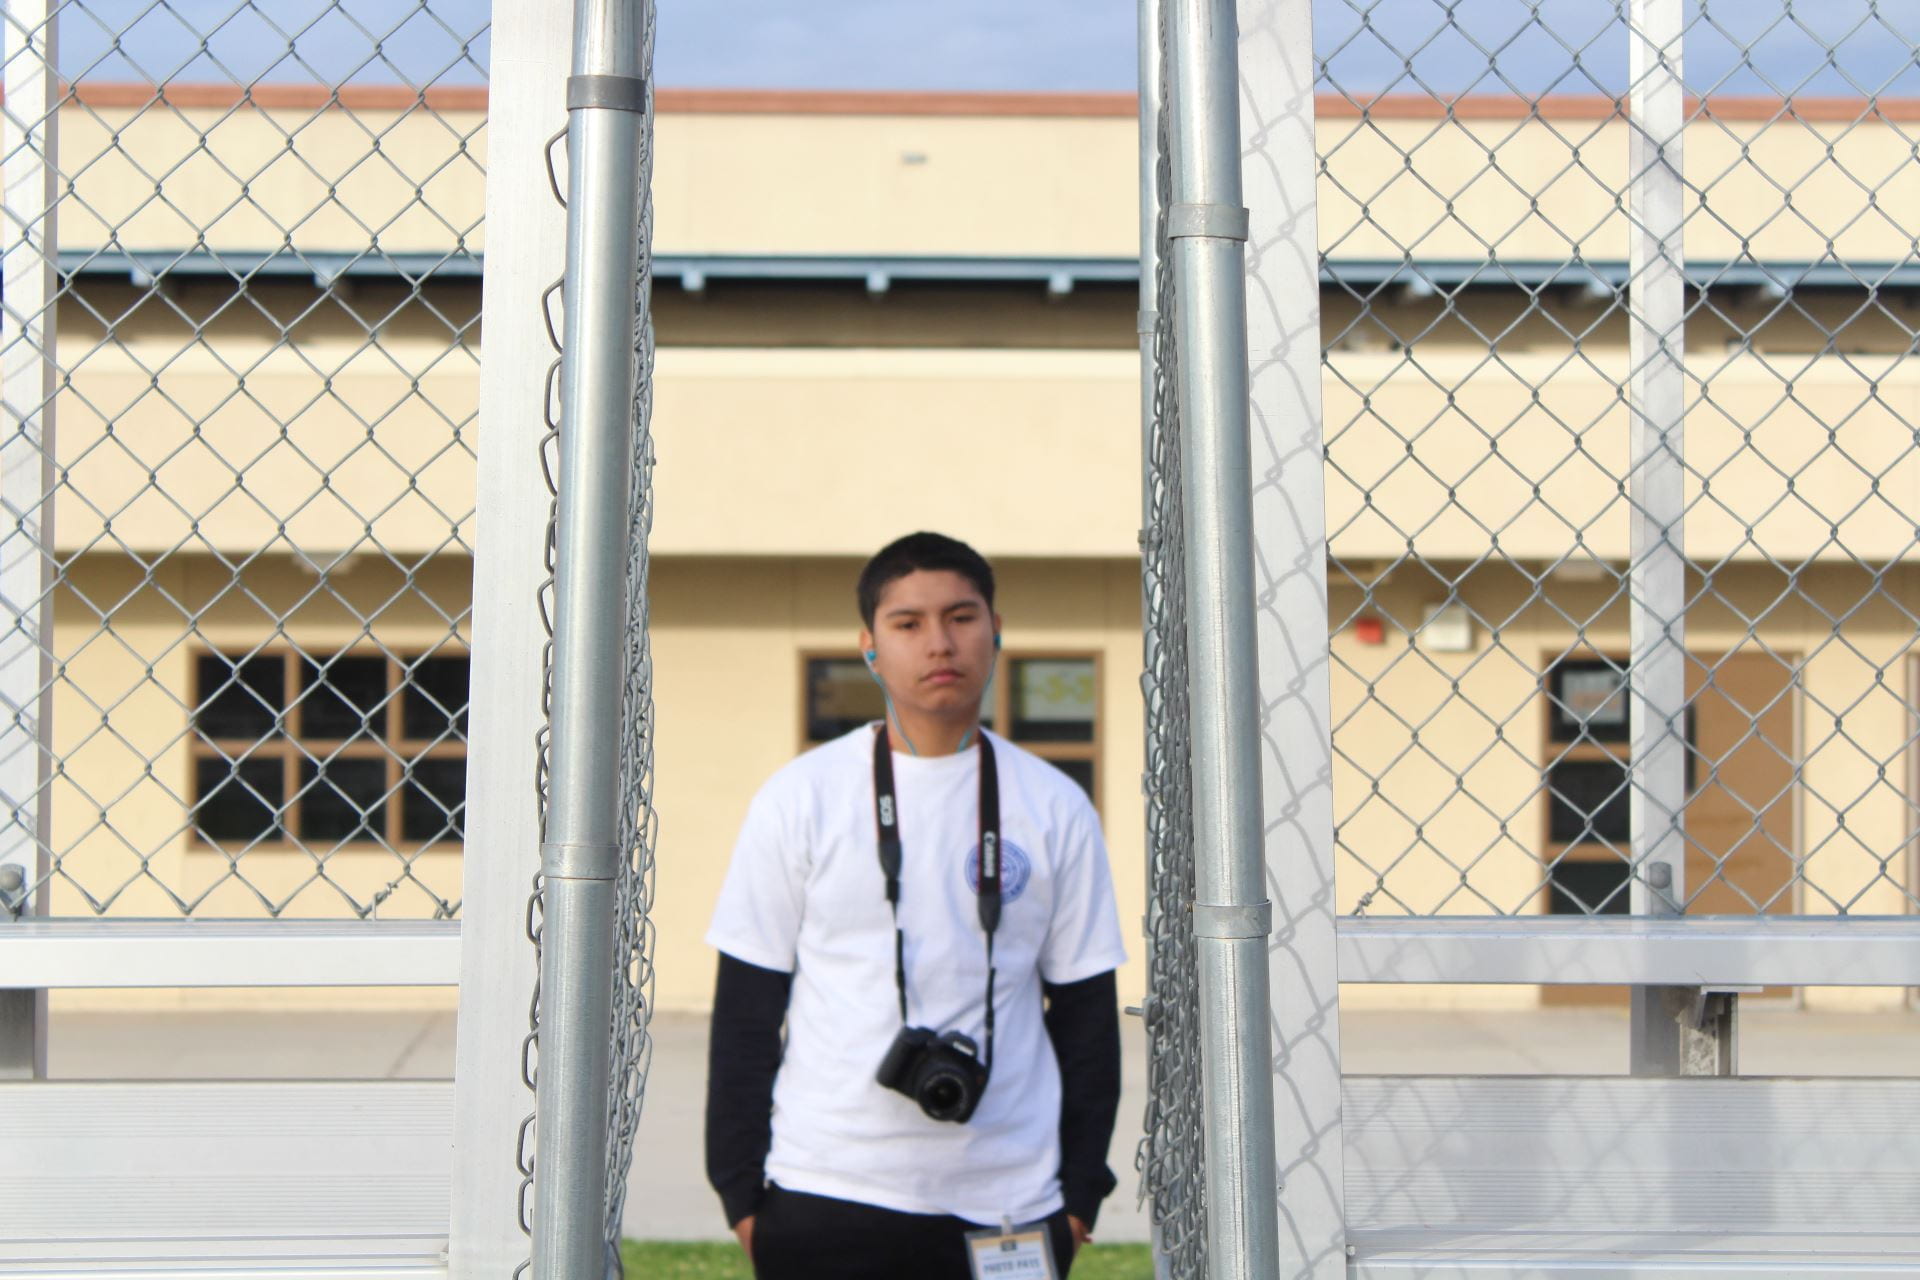
  3. Use a partner or an object as you subject and place them in the foreground of your shot.
  4. Find a location that has visual elements in the middle ground and background.
  5. Set up your camera and tripod between 1-2 feet from your subject. (As close as you can get while still maintaining focus of your subject.)
  6. Take a series of portraits starting with the lowest f-stop (3.5) and gradually increasing it one stop at a time until you use all f-stops (up to f22 for a total of 17 photos).
  7. Upload all your photos to your OneDrive.
  8. Format the card when you put it back in the camera.

Posting Instructions

Create a blog post the includes:

  • an explanation of aperture and how it affects depth of field.
  • explain the difference between shallow and wide depth of field.
  • a gallery of all the photos you took, captioned with the f-stop used for each (no need edit these photos).
  • explain the experiment you just completed, and any observations made in the process.

Posted in Photo 1 Assignments

Thursday 10/27/22: Intro to Exposure and Camera Settings

Today’s Agenda:

  • Intro to Exposure and Camera Settings!
  • Experiment with camera simulator

We will cover the information on this link: Learn | Canon Explains Exposure (canonoutsideofauto.ca)

Extra links w aperture and depth of field definitions/explanations:

https://photographylife.com/what-is-depth-of-field

https://digital-photography-school.com/seeing-in-depth-of-field-a-simple-understanding-of-aperture/

Then you will conduct an aperture experiment on this link:

Play | Canon Explains Exposure (canonoutsideofauto.ca)

CameraSim Web App – CameraSim

Instructions for Aperture f-stop experiment:

Step 1: Change the camera mode on the simulator to APERTURE PRIORITY (Av). THIS IS VERY IMPORTANT!!!

Step 2: Set the aperture setting (f-stop) to the lowest number: 2.8.  Press the blue shutter button to “take a picture”.  Your picture will pop up for you to see.  Read the info and then click “X”. This will save it in the gallery below.

Step 3: Now take another photo with each of the aperture settings:  4,  5.6,  8,  11,  16, and 22.  You should then have a total of 7 photos saved in your gallery when you’re done.

Step 4: Analyze your photos in your gallery. Click on the first one to notice what aperture setting it was taken with, then click the arrow to view the next photo. View them all to answer the following question:

  • How did the different aperture settings affect the images you captured?

Step 5: Clear you photo gallery by deleting each one. Now change the camera mode back to MANUAL. Set the shutter speed to 1/60 and ISO to 400.

Step 6: Take photos using the same aperture f-stops (2.8,  4,  5.6, 8, 11, 16, 22)

Step 7: Analyze your photos again, paying attention to the aperture used in each one, and answer the following question:

  • How did the different aperture settings affect the images you captured this time?


Posted in Photo 1 Assignments

Monday 10/24/22: Super Symmetry (Tessellations) Using Photoshop

Today’s Agenda:

  • Complete the Storytelling Blog Post assigned on Friday
  • Begin your Tessellations Projects (4 inch and 2 inch)

Creating Tessellations!

Instructions: Create a 4-inch tessellation AND a 2-inch tessellation using two different photos of your own! (One photo per tessellation.)

Post both JPEG Tessellations + their original images as a gallery (medium or full size, not thumbnail) to your blog when you’re done!  Check out the student examples gallery below!!

1.First video shows you how to create a blank canvas on Photoshop and how to apply measured guidelines:

*Note: in the video after clicking File>New, I mention you may have the “custom” option but you can also use the “default Photoshop size” option as long as you put the same settings from the video.


2. This next video shows you how to prepare your photo for the super symmetry tessellation effect! (At the end, I say to export your image, but instead you can just flatten and then Save As…to your OneDrive.) Also, see the note about cropping below the video.

***Note on cropping:

Make sure the “delete cropped pixels” box is checked when you’re using the crop tool.  Otherwise, if you drag your cropped image to the canvas, it won’t remain as a square. Click image below for visual:

Student examples:

More student examples…I couldn’t help myself…

Posted in Advanced Photo Assignments

AdvPhoto 10/21/22: Blog Post-Preparing for Storytelling Project

“Preparing for Storytelling Through Photography Project”:

  • Create a blog post that informs your “audience” about what the Storytelling Through Photography project is about.
  • Share at least 5 tips from yesterday’s video in regard to preparing for a shoot as well as tips for the actual shoot.
  • Do a Google search to find more storytelling photography tips/advice.  Copy and paste the URL for at least one site that provides some good tips.
  • Use the handout provided to you (also provided in the post below) and start answering those questions on this blog post.  If you don’t have an answer for some of the questions yet, leave those blank (You’ll have to type the questions from the handout). But go back and edit this post once you have the rest of the answers!
Posted in Photo 1 Assignments

Friday 10/21/22: Preparing for Storytelling through Photography Project

Today’s Agenda:

  • Sharing ideas on Padlet (community brainstorming)
  • Summarizing storytelling tips

Padlet Community Brainstorming

Head over to teams to find the Padlet link for your class period.  Use the + circle button on the bottom right to add a list of story ideas you are considering or that you think others might find useful. The subject of your Padlet post should include “ideas for photo stories”.

You don’t need to upload anything, just a type a list or description of your idea/s.


Blog Post: Storytelling Through Photography Tips

  1. Create a blog post where you inform your audience about the project you’re about to embark on (Storytelling through Photography using 3 photos).  Title this post “Preparing for Storytelling through Photography Project”.
  2. Then summarize at least 5 tips they can use to come up with ideas, to prepare for a photo shoot, as well as tips during the photo shoot. You can reference the video we watched yesterday by clicking the link below and watching again (headphones are in the front of the class).  And you can also do your own research online to find even more tips! (I added 2 websites at the end of this post that you can reference.)
  3. If you have an idea or ideas of what type of story you want to tell, then share that with your audience as well. Even if it’s a general idea or theme.

Period 2: https://edpuzzle.com/assignments/63517137336cc3410e62707c/watch

Period 3: https://edpuzzle.com/assignments/63517137dc96e940fa9218d1/watch

Period 5: https://edpuzzle.com/assignments/63517137af8dd6415ae93231/watch

Period 6: https://edpuzzle.com/assignments/63517137f3ba18413e2a2cb3/watch

Extra resources I found (hope they’re not blocked):

https://digital-photography-school.com/8-tips-storytelling-images/

https://www.lightstalking.com/storytelling-through-photography/

Posted in Photo 1 Assignments

Thursday 10/20/22: Gallery Walk and Video

Today’s Agenda:

  • Rules of Composition Gallery Walk with Worksheet
  • Video: Telling a Visual Story with Photography

You will review the work of two classmates today.  Use the worksheet at your peer photographer’s desk to leave your feedback for each rule of composition.  Tell them what they did right and/or what they could have improved.


YouTube Video: Telling a Visual Story with Photography

Posted in Photo 1 Assignments

Tuesday 10/18/22: Exploring Christina Fernandez’s Work

Today’s Agenda:

  • Exploring and discussing the photographic work of Christina Fernandez
  • Storytelling through Photography-upcoming project
  • Photo to spark ideas: Student Photo Examples

Part 1: Taking a look at Christina Fernandez’s photographic work together.

https://galleryluisotti.com/artists/christina-fernandez/images/

Part 2:

“Four-Step Critique Process” w/ a partner: Pick ONE photo together. Fold your paper in half twice to create four boxes.  Title each box with each step of the critique process.  Answer the questions together in the boxes.   On the back, put your names and the title of the photo you chose.

  1. Describe: what do we see in the photo?
  2. Analyze: how did the photographer create this photo? What decisions were made? (visual elements, emphasis/contrast, color, camera angles, rules of composition, editing, etc.)
  3. Interpret: what does the photo communicate? What is the photographer trying to tell us/show us?  Themes, ideas, feelings, mood, memories, etc.
  4. Evaluate: What makes the photo successful?  Does it achieve what the photographer intended (when we know intention)?  What could be improved?

Upcoming project to start thinking about:

Posted in Advanced Photo Assignments

Adv Photo 10/13/22: Today’s Instructions

Hey everyone, sorry I’m out. My son is too sick to go to school and I couldn’t get someone else to watch him.

I will extend the deadline for the portrait series I had assigned until Monday of next week. In the meantime, I would like you to do the following…

1-Create a blog post addressing the following:

  • Tell me about your experience of looking at Christina Fernandez’s photographs.
  • How is viewing the photographs in person different than viewing on our computers?
  • How does learning about the photos change the way you view them or relate to them?
  • What was your favorite part about the field trip? Explain.
  • What part could have been better? Explain.

2- Post your favorite photos that you took on the trip as a gallery. Your choice if you want to edit them or not. Those that didn’t get to upload, your photos can be found in the following link, I saved them in folders with the letter of the camera:

Field Trip Photo Folders

Publish and turn in on Teams.